1、自定义启动页
[TOC]
springboot的打包方式有很多种。可以打war包,可以打jar包,可以使用jekins进行打包部署的。不推荐用war包,SpringBoot适合前后端分离,打成jar进行部署更加方便快捷。
1、自定义启动页
banner.txt内容
=======================
        No BUG
=======================
这样就替换了原先SpringBoot的启动样式。
2、打包配置
2.1 打包pom配置
<!-- 项目构建 -->
<build>
    <finalName>${project.artifactId}</finalName>
    <resources>
        <resource>
            <directory>src/main/resources</directory>
            <filtering>true</filtering>
        </resource>
    </resources>

        <!-- SpringBoot插件:JDK编译插件 -->

            <groupId>org.apache.maven.plugins</groupId>
            <artifactId>maven-compiler-plugin</artifactId>
            <version>2.3.2</version>
            <configuration>
                <source>1.8</source>
                <target>1.8</target>
            </configuration>

        <!-- SpringBoot插件:打包 -->

            <groupId>org.springframework.boot</groupId>
            <artifactId>spring-boot-maven-plugin</artifactId>
            <configuration>
                <jvmArguments>-Dfile.encoding=UTF-8</jvmArguments>
                <executable>true</executable>
            </configuration>
            <executions>
                <execution>
                    <goals>
                        <goal>repackage</goal>
                    </goals>
                </execution>
            </executions>

        <!-- 跳过单元测试 -->

            <groupId>org.apache.maven.plugins</groupId>
            <artifactId>maven-surefire-plugin</artifactId>
            <configuration>
                <skipTests>true</skipTests>
            </configuration>


</build>
2.2 多环境配置
1)application.yml配置
server:
  port: 8017
spring:
  application:
    name: node17-boot-package
  profiles:
    active: dev
2)application-dev.yml配置
project:
  sign: develop
3)application-pro.yml配置
project:
  sign: product
3、环境测试接口
package com.boot.pack.controller;
import org.springframework.beans.factory.annotation.Value;
import org.springframework.web.bind.annotation.RequestMapping;
import org.springframework.web.bind.annotation.RestController;
@RestController
public class PackController {
    @Value("${project.sign}")
    private String sign ;
    @RequestMapping("/getSign")
    public String getSign (){
        return sign ;
    }
}
4、打包执行
4.1 指定模块打包
4.2 运行Jar包
运行dev环境
java -jar node17-boot-package.jar --spring.profiles.active=dev
运行pro环境
java -jar node17-boot-package.jar --spring.profiles.active=pro
dev环境打印:develop
pro环境打印:product
5、SpringBoot发布的8个原则
5.1 在发布模块打包,而不是父模块上打包
比如,以下项目目录:
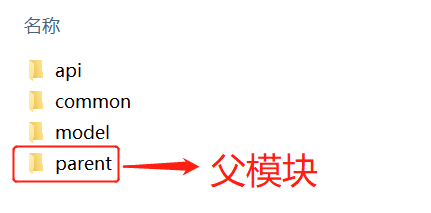
如果要发布 api 就直接在它的模块上打包,而不是在父模块上打包。
5.2 公共调用模块,打包类型设置为 jar 格式
公共模块,比如 common 和 model 需要设置 packaging 为 jar 格式,在 pom.xml 配置:
jar
5.3 发布模块打包类型设置为 war 格式
在发布的模块 pom.xml 中设置:
war
5.4 排除内置 tomcat
在发布的模块 pom.xml 中设置:
<dependency>
	<groupId>org.springframework.boot</groupId>
	<artifactId>spring-boot-starter-tomcat</artifactId>
	<scope>provided</scope>
</dependency>
当设置 scope=provided 时,此 jar 包不会出现在发布的项目中,从而就排除了内置的 tomcat。
5,5 设置启动类
此步骤相当于告诉 tomcat 启动的入口在哪。需要在启动类添加如下代码:
@SpringBootApplication
public class ApiApplication extends SpringBootServletInitializer {
    @Override
    protected SpringApplicationBuilder configure(SpringApplicationBuilder application) {
        return application.sources(ApiApplication.class);
    }
    public static void main(String[] args) {
        SpringApplication.run(ApiApplication.class, args);
    }
}
5.6 如果使用拦截器一定要排除静态文件
比如我在项目中使用了 swagger,那我就需要排除 swagger 的静态文件,代码如下:
@Configuration
public class WebMvcConfig extends WebMvcConfigurationSupport {
    @Override
    protected void addResourceHandlers(ResourceHandlerRegistry registry) {
        // 排除静态文件
        registry.addResourceHandler("swagger-ui.html")
                .addResourceLocations("classpath:/META-INF/resources/");
        registry.addResourceHandler("/webjars/**")
                .addResourceLocations("classpath:/META-INF/resources/webjars/");
    }
    // do something
}
5.7 先装载公共模块,再发布项目
如果发布的模块引用了本项目的其他公共模块,需要先把本项目的公共模块装载到本地仓库。
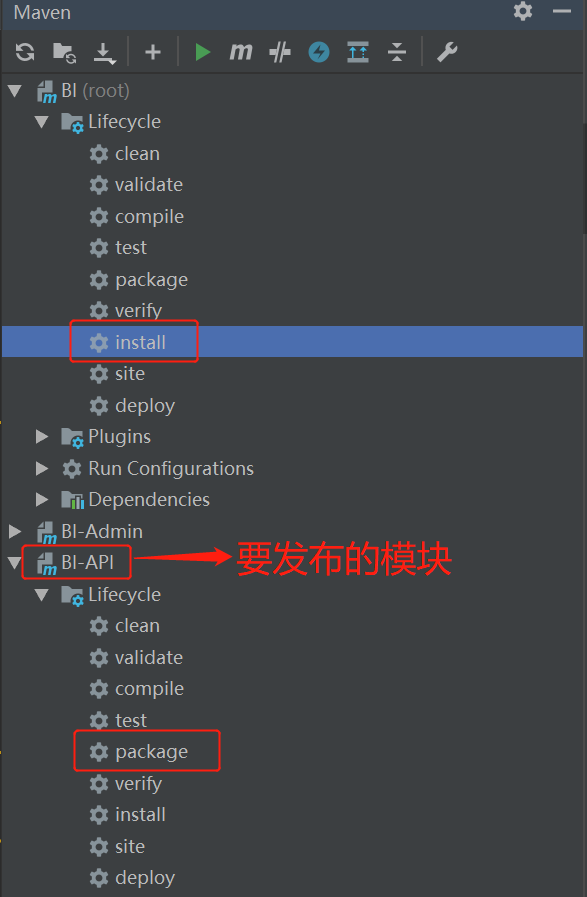
操作方式,双击父模块的 install 即可, install 成功之后,点击发布模块的 package 生成 war 包,就完成了项目的打包,如下图所示:
5.8 部署项目
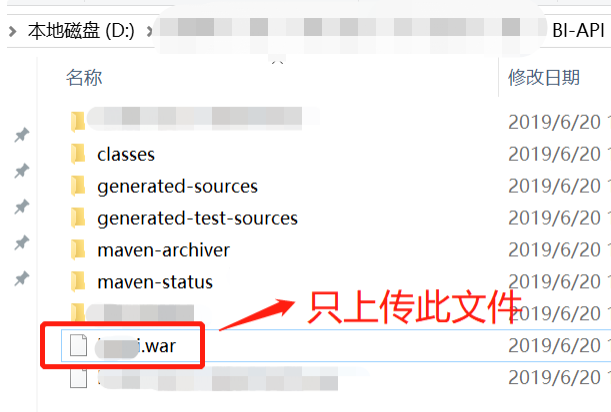
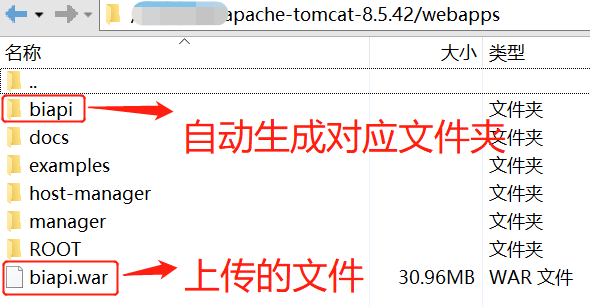
有了 war 包之后,只需要把单个 war 包,放入 tomcat 的 webapps 目录,重新启动 tomcat 即可,如下图所示:
项目正常运行会在 webapps 目录下生成同名的文件夹,如下图所示:
本文采用 CC BY-NC-SA 4.0 协议发布


